|
|
A professional manufacturer of three-dimensional measuring devices for the on-machine measurement and in-machine measurement |
| Difference in "external contact type" and "internal contact type"? Is there anything to be aware of when selecting? | |
| For sensor selection when doing in-machine measurement and on-machine measurement, "External contact type " when the object to be measured is a metal or nonferrous metal, In the case of non-metal such as wood and plastics, it will be "internal contact type ". In other words, the measuring instrument which can be used depends on whether or not the object to be measured has conductivity. | |
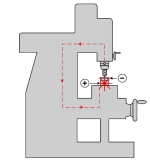
 External contact type External contact typeAdvantages: Inexpensive and highly accurate measurement is possible. Disadvantage: You can not measure wood, plastic, rusted metal. Magnet cables are required for ceramic spindles. [Basic principle of external contact type Point Finder] The machine is made of metal. Metal can conduct electric current. If the point finder is attached to the spindle, the Current flows and (-) is charged. stylus is charged (+) So, when this touches the work, the LED will light up. [Point Finder (PTN, PTC, WP type), Centering Gauge Swing Type (NM type)] This is where the radius of the stylus is separated from the work. By correcting for the radius, centering and measurement can be performed with an accuracy of ±1 / 1,000 mm. [Tool Setter (M-50, S-50, S-100 type)] The edge is coming 50 mm or 100 mm away from the workpiece. Tool setter is "+ input" in Fanuc of machining center, "write" in Okuma If you press the button, the tool length is automatically entered into the offset.  Even when the end mill coating is ALC, DLC, etc., it can not be measured with the external contact method. In case of unknown at the time of purchase, please check with us once. |
|
 Internal contact method
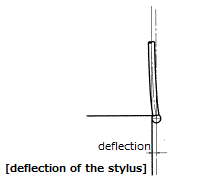
 [Point Finder] Advantages: Wood, plastic non-metallic products etc, You can measure any material. Disadvantage: An error of " quantitative error " appears. There is a Deflection due to deflection of the stylus. It is more expensive than external contact method. |
|
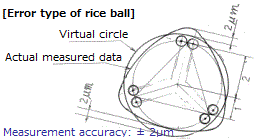
 [Basic principle of internal contact method point finder] The internal contact method has a three-point structure, and a stylus works Mechanism by which the fulcrum is released and the LED emits light to make measurements when touched is. At that time, "quantitative error" due to deflection of the stylus Will occur. Support of internal contact with 3 points It is structured. When the stylus tilts, it may support two points or one fulcrum. As the distance between fulcrums doubles, errors like triangles appear. If you draw a temporary circle that passes between the apex and the side of the triangle, it can be said that the error between the circle and the edge is ± 2 μm understand. The amount of deflection increases as the stylus gets longer. The correction value can be obtained by subtracting the stylus diameter + block value from the actual measurement value of the gage block and to 1/2. [Tool Setter (i-50)] There is no rug. If you press the "+ input" in Fanuc and the "write" button in Okuma where the LED lights, The tool length is automatically entered in the offset. |
|
| Products that are relevant to this question is as follows. It will jump to the corresponding page by clicking. [Point Finder Series] [Tool Setter Series] [Centering Gauge Swing Type] |


 Nissin Sangyo Co., Ltd. ―Measuring Instruments for The Machine Tools―